Welcome to ChildFun…where Play and Learning go Hand in Hand
...where play and
learning go hand in hand!
Home » Articles » General » How to Keep Your Toddler Entertained While Homeschooling
How to Keep Your Toddler Entertained While Homeschooling
By Linda J. Coyle
Tip #1: Divide and conquer!
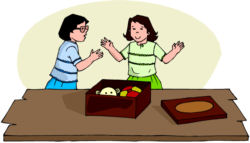
It is a fact that children have too many toys and that they usually have too many toys out at one time. I have seen the look of confusion on my child’s face when this occurs. They seem to not know what to play with first! You see this especially after birthdays or Christmas. Since keeping your home fairly tidy when you homeschool is always a challenge, this little tip can kill two birds with one stone.
Divide your child’s toys up into some kind of boxes or organizers. (Since we had no money for fancy organizers, I was content to use cardboard milk carton boxes that my local grocery store had.:-) They have tons of these boxes every time they stock milk. These boxes are square so they stack nicely.) Divide up your child’s toys and allow them to play with only one box of toys at a time. Store the other boxes away out of sight and reach.
Now, when you are homeschooling another child and your toddler is terrifying the scene, it may be time to change toys! You decide how often to change the toys around but don’t do it too often. We teach our children to be discontent and unimaginative (finding other uses for a toy) when we give our child too much or toys that do everything for them.
There were even certain favorite toys that I would only allow my toddler to play with during homeschool. If you tell the child that this particular box contains their “work”, they feel a part of your homeschool. (This worked probably because I stored each child’s school texts and notebooks in separate plastic milk crates…I made sure my little one had one too.)
Tip #2: Put books on tape for your child
When I had a seventh grader, a fourth grader and a toddler this worked very well. I cajoled–or paid in cash or favors or assigned as part of their homeschooling, I forget which!–each of my older children to tape record a little book for my toddler. This was a good way for my older children to practice oral reading AND to be creative. I remember my son particularly took the “making sounds” very seriously–he made whistle sounds for a book that had a train in it and BANGS when someone fell down. Sort of like the old radio programs…your older ones can REALLY be creative doing this.
Of course they had to create a BONG for when the toddler should turn the page. I then wrote on the cassette tape’s label exactly which books were read and in what order. Organize the books in order in a pile, sit your toddler in a “special chair”, put the cassette tape in and WOW! Instant reading center for your little one! Include a headset and they really think they are big stuff. Keep these books and tapes in a separate box away from other books that you read to them and they have a more “special” quality to them.
I always required my 3 or 4 year old to STAY seated for AT LEAST one story if THEY chose this activity. That is a way they you train them to increase their attention span a little at a time. Then, when they go to Sunday School, they KNOW how to sit for a story. Parents who don’t train their child in this way always wonder why their child has a short attention span. Notice the key here is that the CHILD CHOSE the activity.That is an important distinction to this rule–if YOU force this activity on your child that is an entirely different story. You will of course have to demonstrate to the child the first few times HOW to do this activity until THEY themselves are asking to do it alone. (THIS IS AN IMPORTANT STEP AND DISTINCTION! Don’t leave this step out or this will not work.)
I tried to make my little one understand that if I went to the trouble of setting this reading corner up for them (at their request) and get their books down, they had to STAY in that area and listen to at least ONE story all the way through. Usually, my child loved this so much that they would stay longer and longer over at “their reading center.” Use a reward system rather than punishment to enforce this and you will be helping your child develop good learning and reading habits early.
Don’t have older children to read to the younger one on tape? How about another relative–grandmother or grandfather, aunt or uncle? Or even an enthusiastic teenager or babysitter!If you have money and can buy the pre-made tape and book combinations sold everywhere you can use them too.But I found my child enjoyed a relative’s version better!
Tip #3: Use a soap holder and an eyedropper
I think I learned this one at the Bob Jones University Homeschool Conference years ago–If you buy an oval-shaped soap holder, the kind that has those little suction cups on it on both sides, a toddler can have all kinds of fun. Here is how it works: (1) fill up an unbreakable cup with water, (2) show your child how to use the eyedropper to fill up each and every little suction cup on one side with one (and only one) drop of water, (3) show your child how to empty the suction cup and do it again! Applaud their efforts when they have it done correctly. This activity promotes great eye-hand coordination and fine finger movements and is great fun because toddlers love playing with water! If you are not concerned about clothing, add a drop of food coloring to the water.
Tip #4: Use styrofoam “peanuts” or packing material
Note:This tip is only for little ones who are not putting things in their mouths anymore! IT IS NOT FOR BABIES!
You know those little styrofoam things that look like “peanuts…well, o.k., deformed peanuts?” I have given a plastic bowl of those to my toddler along with pots, a plastic spoon and some other plastic bowls or cups. Toddlers love to play “put and take” or “fill and dump”. Kids play with this for quite awhile!
Another caution: Be aware that by playing with pots, kids may become fascinated with them enough to reach for a pot on a stove…so keep pot handles turned IN and away from reach and as always with little folks BE ONE STEP AHEAD OF THEM AND BE AWARE! Mine never grabbed at pots even though they played with them like this, but it COULD happen.
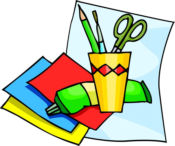
Tip #5: Provide a Dress-Up Box
Put this box in the homeschool teaching “area” and ONLY allow it out while you are teaching your older children. This is what you should do with other ideas on this page as well…that makes the activities “special” and can be construed as “the tiny tike’s ‘school’ materials”…they can do their “school” while the older ones do theirs. VERY IMPORTANT that they feel included in “school”. (My older ones said they would rather do dress-up than their work as their school too…big surprise!)
Keep a lot of old clothes that a child can “slip” on–old T-shirts, dresses, etc. Either provide nothing with buttons or zippers or they will constantly be after you to “do them up” or make this a rule that they can’t ask. Include hats, scarves, broken watches, necklaces, big shoes, old purses, etc. Of course if you can mount a large mirror nearby that is fun too! Let them play as you teach your others nearby. Cute–you may even want to have a camera nearby.
Tip #6: Make sewing cards (great for eye-hand coordination and to develop fine finger movements anyway!)
This too, would be for use only during homeschool time. Here is what I did:
1) Keep wax-coated cardboard for awhile (like the kind of cardboard on frozen pizza cartons).
2) Cut these cardboard pieces into shapes–ovals, circles, triangles, etc. Make fairly uniform in size.
3) Hole punch around the perimeter of each object.
4) Cut out pieces of yarn long enough to go around and through all the holes.
5) Knot or put a large tape “tape ball” on one end so when your child starts to “sew” it doesn’t pull through the hole.
6) On other end of yarn make a “point” using scotch tape. This is the part he’ll push in and out each hole.
7) You may make also make sewing sets out of large plastic lids too…like found on Cool-Whip, ice cream or 2 lb. butter tubs.
8) Put all in a large envelope so your “set” is together.
Tip #7: Make some colored macaroni and let your child have some funwhile learning
1) Color “wheel” macaroni or any other kind of pasta that has large openings.
2) Prepare a yarn “needle” (See Steps #5-6 under Tip #6).
3) To color the macaroni, put several drops of food coloring (your choice of color or do a little of all the colors as I did) in about 4 oz. of cold water (remember–you don’t want to cook the macaroni, so use cold water!). Put pasta in. Shake or stir around. Leave in for about 1-1 1/2 minutes. You don’t want to keep pasta in until it gets soft. Take pasta out with a slotted spoon and lay them in a single layer of newsprint or paper towels. Turn pasta over after it is fairly dry on one side so the other side can dry. Some may stick. Not alot of mine did. Store in airtight container and use for activity below.
ACTIVITIES WITH COLORED PASTA
1) Let your child string and unstring the pasta. Ask them to make it really LONG…that will take them awhile–ha, ha.Of course you provide a long enough “needle”.
2) For older preschoolers, give them a challenge. Ask them to do the stringing in a pattern you or they pick. Give them an index card (I created several beforehand for them to pick from) showing the pattern. (Example: Your card may show RED, GREEN, YELLOW, RED, GREEN, YELLOW.) Your child must do their string in that pattern only. Try variations…like 2 red, 1 yellow, 1 blue and then 2 green. Give them harder and harder patterns to follow. Reward them somehow when they complete one of their cards. (I had many reward systems over the years…more on that subject later). Another variation of this theme is if they are learning to count, tell them to string several yarn needles full of ONLY say, SIX on a strand. Of course, you’ll have to have several ready “needles” for them to do this.
3) I also prepared index cards of a group of colored dots. Example: On one card draw a blue dot, a blue dot, a yellow dot, an orange dot, a green dot and then a blue dot. Your child is to lay the same color pasta on top of each of your dots. If you look in preschool catalogs as I have they have what is called ATTRIBUTE/PATTERN cards similar to this idea. They use fancy plastic “cute” things like kitty cats or other objects. Their cards are laminated and in a big, fancy box and cost big money.Get an educational preschool catalog and have a look sometime. Who needs to spend the money? This idea of practicing patterning IS a preschool idea. Just vary it using homemade materials…save money. To save your precious time, let one of your older children make the colored pasta and cards for you.
Tip #8: Make a Penny Count Basket
1) Make a poster board showing “cells” of numbers. Example: Draw a square, write “1” in it. Draw or tape down “1” penny in the square. Do the same with each square…up to ten or twenty…your choice. I’d start with 10 first and then draw two more squares at a time up to twenty as child gets better at this skill.
2) Give your child a basket or plastic container of pennies and have him match up pennies that you have put down with the picture in each square. (Ex. In the “2” cell, he would put below your example 1, 2 pennies in a one-to-one correspondence. Check him when he is done by having him count each cell with you. Repetition is what teaches counting!
3) Eventually “test” your child by showing him only a number “3” printed on a index card and have him lay down 3 pennies and say “3”.You might even write the word “three” along with the number “3” back in step one so that the child is learning a sight vocabulary word along with the printed “3”. You would only do this if your child already knows the alphabet though. Then you could hold up a card that says “three” and see if he can lay the correct pennies down when seeing the word too.
Note: Of course you will have to demonstrate how to do this task by counting and doing this with your child until he can practice on his own. Maybe just do #1-5 for several days and add a number a week until this skill is mastered. This eventually is a good independent activity but not at first.
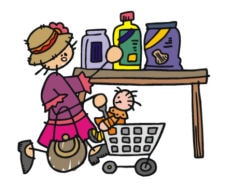
Tip #9: Make a “Store”
1) Keep old cardboard cereal, pudding, cookie, jello boxes, etc., cleaned out milk and juice jugs, etc. until you have a good stock pile. Put all of these things into a big box.
2) Give your child a place to set up all his “stock”.
3) Give them paper bags to pack and unpack their store items in. (Be careful with plastic bags–use only if you can trust your child not to put them on his head!)
4) If your child is beyond the “everything-in-their-mouth” stage, give him something to hold play coins in (like an old purse) and give him a box to open and close to use as a cash register of sorts. Maybe even make a cardboard square that can be the “price scanner” used at many registers today. (You may hear alot of “beeps” though so be prepared–make a rule: only quiet beeps!)
5) I even gave my child unopened vegetable and fruit cans. (Don’t give them already used, cleaned cans because they still may have sharp edges from the can opener!)
6) If you are lucky enough to find a little plastic shopping cart found in many dollar stores, your center is complete!
7)Encourage your child to pretend that their stuffed animals are the customers or you will be asked to be a perpetual one!(I wonder how I know?However, I did become a customer one or two times if my child could play quietly alone for say, fifteen minutes at a time!)
(I did make sure my child helped with the clean-up too! They had to help me put cans back into our cupboards. We also agreed that if the “store” was brought out–the child had to play with it for at least 1 hour before a new activity could be selected. We also kept this activity only for use during homeschool time.)